1940's · 1944 · desserts

Vintage Recipe – Steamed Christmas Fig Pudding with Hard Sauce


So bring us some figgy pudding,

So bring us some figgy pudding,

So bring us some figgy pudding, and a cup of good cheer!”

Ah, figgy pudding – the stuff of Christmas music legend. 

I have fond memories of figgy pudding, but growing up on the other side of the pond my memories are solely tied to the above referenced lyrics. Many a Christmas grade-school concert featured a rousing version of “We Wish You a Merry Christmas”, entirely out of tune and sung at a volume that would have undoubtedly made Victorian Englanders cringe. 

Yet fond and abundant memories do I have of figgy pudding despite never having tasted it. 

I had every intention of making my own 1944 (and undoubtedly, very Americanized) version of figgy pudding last year. Unfortunately, there was nary a pudding mold to be found and even the great and glorious Amazon couldn’t deliver it faster than mid-February. So, I tabled the idea and made Holiday Fruitcake instead, which I am now realizing with a fair amount of shame, is the last time I posted to this blog. Quelle horreur!

Regardless, I did eventually find my pudding mold quite accidentally in a kitchen supply shop a few weeks after Christmas and made my purchase with glee.

Fast forward 11 months and I excitedly retrieved my pudding mold from the storage cupboard, opened up my 1944 Good Housekeeping cookbook, and…was instantly concerned when I read “1 ⅓ pounds of ground suet”. Oh…no…foiled again?

Thankfully a bit of research revealed that frozen, grated Crisco would make a suitable enough replacement so I elected to go with that option and started baking.

As soon as I started the preparations I was taken back to last Christmas and the fruitcake. Somehow I had managed to forget just how messy and time consuming it is to dice dried fruit. Alas, I persisted with ease until it was time to grate the frozen Crisco. I anticipated a mess and was not disappointed. If I had it to do it again, I would skip this step entirely and just use room temperature shortening as it was practically melted after being handled and grated anyway.

Overall, the recipe was quite easy to make and took exactly 45 minutes from start to steam, as it were. 

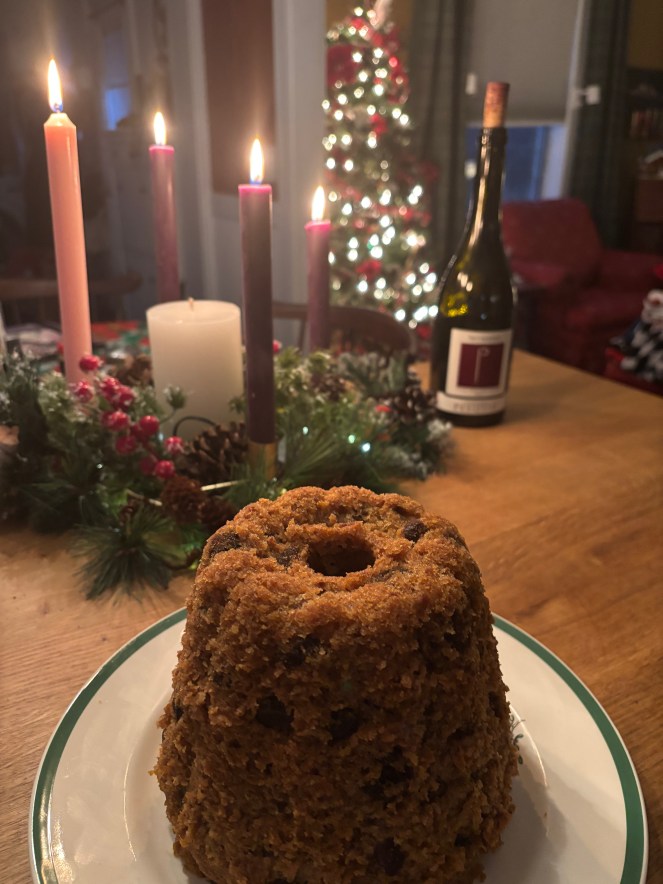
To steam the pudding, I used a pot that was just about a half inch larger in diameter than the pudding mold and followed the instructions to fill the pot halfway with boiling water and steam, covered for 2 hours. I checked periodically and added more boiling water from the kettle as needed. With no obvious way to check for doneness, I blindly trusted the recipe and my hob and pulled the mold out of the pot at 2 hours on the nose. I then placed the still-sealed mold on a wire rack and let it rest for 30 minutes before I attempted to release it. My mold is made of some indeterminate metal and I greased it (but didn’t flour it) well with leftover Crisco. The pudding required a bit of encouragement both from a chopstick and the Mister’s firm hand, but it did release cleanly and in one piece.

I left the still-steaming pudding to rest a bit longer while we ate dinner and then served it up with a small spoonful of Hard Sauce, which was very much not the pourable sauce I envisioned but rather a nice, hearty buttercream icing. No matter. The first piece fell apart upon slicing, but the second and third held together nicely. 

And the verdict? The Mister, who is not a fan of overly spicy (meaning, nutmeg, ginger, etc) baked goods proclaimed that it was, in fact, not too spicy at all and the flavour of the figs really came through. My Maman agreed with his take on the spice and said that, while it wasn’t her favorite dessert, she would eat it again if I made it. Both mentioned, and I concur, that the Hard Sauce was unnecessary and was almost a bit too sweet. 

Overall, I was pleased with the pudding. It was a bit drier than I expected it to be and having never had pudding before, I have no idea if that is normal. But, it did have a delicately spiced and figgy flavor which I enjoyed. The Mister rated it 7.75/10 and Maman gave it an 8. I would give it a 6. It was good, but I don’t know if it was worth the effort. I would love to try an authentic British pudding to compare as I’m sure the differences would be striking.

Steamed Christmas Fig Pudding

  • Servings: 8-10 Depending on Slice Size
  • Difficulty: easy
  • Print

Ingredients

    For the Pudding:
  • 3/4 lb. (2 1/3 c) chopped, dried, whole figs
  • 1 1/2 c. bottled milk or 3/4 c. evaporated milk and 3/4 c. water
  • 1 1/3 c. suet, ground fine
  • 1 1/2 c. soft bread crumbs
  • 3 eggs, well-beaten
  • 1 1/2 c. sifted all-purpose flour
  • 2 1/4 teasp. baking powder
  • 1 c. granulated sugar
  • 1 teasp. nutmeg
  • 3/4 teasp. salt
  • 3 tablespoon. grated orange rind
  • For the Hard Sauce

  • 1/3 c. butter or margarine
  • 1 c. sifted confectioners’ sugar
  • 1 teasp. vanilla extract or brandy
  • Pinch of salt

Directions


Pudding:
Cook the figs with the milk in a double boiler for 20 min. Combine the suet, bread crumbs, and eggs. Add the cooked fig mixture with the sifted dry ingredients and the orange rind, and mix well. Pour into a 2 qt. greased or oiled, covered pudding mold. Steam on top of the range for 2 hours. Serve with Hard Sauce.

Hard Sauce:
Work the butter with a spoon or beater until light and creamy. Then add the sugar gradually, while continuing to work with a spoon or beat with an electric beater until light and fluffy. Add the vanilla extract, a little at a time, and the salt. Pile lightly in a serving dish, and chili until needed.


I used frozen sticks of Crisco to replace the suet, dried black mission figs, and standard issue white sandwich bread for the breadcrumbs. For the sauce, I used butter and vanilla extract.

Bon appetit and Joyeux Noelle!

1940's · 1944 · desserts

Vintage Recipe – Holiday Fruit Cake


I have a confession to make. I have never, not once in my life, eaten a single, solitary bite of fruitcake.

I have no explanation for this. Is it because my Maman doesn’t like it and therefore never made or bought it? Is it because of fruitcake’s longstanding reputation as the King of Holiday Food Jokes? Is it simply because I’ve seen it in the shops in all of its dark brown, slightly gelatinous looking glory and felt no desire at all to try it? Likely all of the above. 

Regardless of the reasoning, I have managed to make it to the start of my fifth decade on this Earth without a crumb of the Christmastime legend passing my lips. 

So when I was perusing my 1944 Good Housekeeping cookbook for Christmas recipes, I nearly skipped right past today’s recipe without giving it a second glance. “Fruitcake,” I mused, YUCK”. But then I stopped and actually read the recipe. (Novel idea, I know.)  And much to my shock, thought “That doesn’t sound THAT bad. Actually, it sounds rather nice.” The recipe looked easy enough and relatively inexpensive, to boot. So I decided to give it a go. 

Right off the bat, however, I faced a completely unexpected hurdle – finding the necessary candied fruit. I never considered that as fruitcake has become more and more of a joke, it had fallen hopelessly out of favour with the younger crowd and that finding the ingredients to make this old-fashioned dessert would be difficult. Thankfully, one of the grocery chains in my area was stocked with an assortment of brightly colored (and potentially radioactive) vittles that may or may not have actually been fruit at some point. 

In addition to believing the conjecture that fruitcake is inedible, for some reason I also assumed it was very difficult to make. Ordinarily, when making recipes for this blog I keep track of how long I spend preparing the dish. This time, however, I chose simply to enjoy the process and not keep tabs of the minute hand. My sense is that it took about 45 minutes to gather and prep all of the ingredients. A little time consuming? Yes. But difficult? Absolutely not. 

So I chopped and I diced and I mixed and I poured. And then, of course, I licked the mixing bowl and became thoroughly befuddled by the entirely light and slightly sweet batter. “Hmmm”, I thought to myself, “That doesn’t taste bad at all.” Off it went into the oven for an hour and half, slowly scenting the air and creating a bakery-like atmosphere. The Mister returned home while it was baking and commented on how nice it smelled. He asked what it was. I told him fruitcake. He was suitably crestfallen and seemed a tad fearful for his tastebuds. 

After letting it cool and removing it from the pan (I used a metal pan), I admit I was a bit concerned. The exterior was…hard. As in hard tack hard. So hard, in fact, I was slightly concerned my bread knife would not be up to the task of sawing through it. I considered, briefly, dispatching the Mister to his shed to retrieve a saw. But alas, I put all my muscle behind my Sabatier serrated knife and managed to hack off three pieces. The inside, thankfully, was moist and tender. I will not lie. I assumed those three pieces would be the only three we would eat. I assumed the cake would dry out even more upon sitting and the Mister would refuse to use one of his power tools to cut it, for fear of breaking his beloved tool. 

Nonetheless, I plated three pieces and served the Mister and my Maman. Never one to beat around the bush, the Mister commented “well, it doesn’t look like those nasty fruitcakes you see at the store” to which my Maman heartily agreed. We cheers’d and all dug in with our forks…only to have the cake completely fall to crumbs. Oh dear. So we put down our cutlery and dug in like savages with our bare hands. And were all shocked that it was, in fact, good. Actually, it was better than good. It was downright delicious. The Mister and my Maman both agreed – the cake itself was lightly flavoured and tasty, the fruit was complimentary but not overpowering and – perhaps most importantly – it had absolutely zero resemblance to the rubbish found in the shops. I commented that I’d never had fruitcake before, to which the Mister replied “I had one piece one time and never again” and pulled a face. 

I asked round the table how many stars out of 10? 7, said the mister. 8, said Maman. Then I asked “Would you actually want me to make this again next Christmas?” And, much to my shock, they both agreed. Perhaps the best testimony is what happened next. The Mister got up and sawed off another slice. And with that I knew it was a winner.

The recipe states that the cake keeps well. I was a little nervous given the rather brick-like resemblance, but I enveloped it in plastic and hoped for the best. And keep it did. I heartily enjoyed the cake daily for tea time over the next week and only at day 9 did it even start to seem a little dry and stale. Not too sweet and not heavy, this holiday fruitcake was the perfect tea time treat and a lovely antidote to the modern tastes for overly sugared deserts.

Overall, I was tickled with how this turned out. I highly recommend you put aside your negative notions and give it a go – you will not be disappointed.

Holiday Fruit Cake

  • Servings: 8-12 Depending on Slice Size
  • Difficulty: easy
  • Print

Ingredients

  • 1/2 c. shortening
  • 1 c. granulated sugar
  • 3 eggs, well-beaten
  • 1 tablesp. grated lemon rind
  • 1 tablesp. grated orange rind
  • 2 1/2 c. sifted cake flour
  • 1/2 teasp. salt
  • 1 c. chopped seeded raisins
  • 1 c. chopped walnuts
  • 1/2 c. cut-up candied cherries
  • 1/2 c. cut-up candied citron
  • 1/4 c. orange juice

Directions

Work shortening with the back of a spoon until light and fluffy. Then add sugar gradually, while continuing to work with the back of spoon until fluffy. Add eggs and lemon and orange rinds, stirring until thoroughly combined. Sift together flour, salt, and baking powder. Combine 1/2 c. of this flour mixture with combined raisins, walnuts, cherries, and citron. Add remaining flour mixture in halves, alternately with orange juice, to shortening mixture, blending well after each addition. Last, add raisin mixture, and mix well. Pour into a greased and floured 9″ x 5″ x 3″ loaf pan, and bake in a moderate oven of 325 F. for 1 1/2 hrs, or until done. This cake keeps well.


I cheated and used my electric mixer, instead of working with a spoon. I baked my cake in a metal pan and used the standard as a measure of doneness (toothpick inserted in middle).

Bon appetit!

1940's · 1944 · main dishes · soup · vintage recipes

Vintage Recipe: Mushroom Shrimp Bisque

There are several recipes in my 1944 Good Housekeeping cookbook that immediately intrigued me the very first time I flipped through it. The Apple Cheese Crisp I made a while back was one of said recipes, as was the recipe I tried today: Mushroom Shrimp Bisque.

Right off the bat, this recipe ticked all the boxes for me: mushrooms? Yes, please. Shrimp? Sign me up. Soup? Always. To boot, the recipe looked extremely simple and quick to get on the table during a busy week at the office. But the real kicker was the unique nature of the recipe. Located in a section of the cookbook that focused on combining two different canned ingredients to make a new dish, I thought the recipe for Mushroom Shrimp Bisque sounded creative and I could not wait to try it. 

Easy? Absolutely. The hardest part of this recipe was finding my can opener in the Kitchen Drawer from Hell. Fast? Without a doubt. I had this recipe done and on the table in less than 10 minutes. Now that’s what I call an ideal weeknight supper! This is GREAT, I thought to myself and I could not wait to dip my spoon into the bowl.

As I ladled the soup and delivered it to the table, I could tell the Mister and my Maman were not quite as enthusiastic as I was. “THAT’S what we’re having for dinner??”, the Mister asked. “What’s in here?”, asked my Maman. I excitedly shared the name of the recipe and we all took our first bite.

The glances at the dinner table told the tale. There was no immediate reaction of “wow!” or even furrowed brows whilst we decided if we enjoyed the soup or not. There was silence. 

The Mister, brave former Marine that he is, piped up first with “it doesn’t really have any flavor, does it?” My Maman quickly agreed that it was very, very bland. Staunch defender of my own cooking that I am, even I couldn’t put a positive spin on this one. What a disappointment. 

So what DID it taste like? Well, frankly, it tasted like a warm bowl of milk with things floating in it. Actually, plain warm milk probably would have been better. The soup lacked any taste of mushroom or shrimp. None of us could discern any hint of tabasco, onion, or sherry either. To say it was an unsatisfying supper would be an understatement. It was very, very bland. In fact I commented that it would be a nice soup for someone requiring a bland diet. 

If you do happen to have a medical condition that requires you drop a few pounds and eat a bland diet, nutritionally this soup isn’t bad: in just 77 calories you get 50% of your daily vitamin D needs as well as over 5 grams of protein. Normally I don’t do a nutritional analysis of the recipes I try, but I’m trying to make lemonade here! 

That all being said, I appreciate the recipe for what it was – a creative way for a woman to feed her family a nutritious meal on a tight budget during a time of war and food rationing. If it was 1944 and this was my dinner, I would have been mighty glad to have had it.

Mushroom Shrimp Bisque

  • Servings: 6
  • Difficulty: easy
  • Print

Ingredients

  • 1 can condensed cream of mushroom soup, undiluted
  • 1 ½ c. bottled milk or ¾ c. evaporated milk and ¾ c. water
  • 1 c. canned or cooked shrimp
  • Dash tabasco sauce
  • 1 teasp. minced onion or chives
  • 1 to 1 1/2 tablesp. sherry (optional)

Directions


Stir together the mushroom soup, milk, and shrimp, which have been flaked after removal of the black vein down the back. Then add the tabasco and onion, and heat well but do not boil. Just before serving, add the sherry if desired. Serves 6.


I used canned shrimp for this recipe, draining the liquid as a treat for the cat. He refused it. I should have known.

Bon appetit!

1940's · 1944 · beans · beef · main dishes · side dishes · vintage recipes

Vintage Meal: Somerville Meat Loaf and Mashed Potatoes with Lima Beans and Scallions

Winter is still in full swing here in the United States and after feeling a bit under the weather for the better part of a month, I decided some good old-fashioned comfort food was in order. 

I asked The Mister what he was craving and all I got was “meat” as a response. Pressing harder, he narrowed it down to beef so I set off in search of a relatively quick dinner – so many of the beef recipes in my Good Housekeeping cookbook take quite a long time. There is one recipe in particular (involving, beef, bacon and dill pickles) that I am especially intrigued by, however it takes a full 2 hours of simmering time and a busy business housekeeper just can’t pull that off during the week. 

So, I gave the Mister three options – Beef Curry, which he vetoed; Creamed Beef on Toast, which he so eloquently referred to by its military nickname of S**t on a Shingle; and meatloaf. He enthusiastically chose the meatloaf, so meatloaf it was. Not quite as quick of a turnaround time as I had hoped, but we still managed to eat at a respectable hour.

I, of course, have made many a meatloaf in my day and tried many recipes – sometimes I’ve used no recipe at all. Meatloaf’s saving grace is that it’s pretty darn hard to screw up. Even a “bad” meatloaf is usually still salvageable with the right condiments. One of my favorite recipes for meatloaf comes from a famous YouTube chef and includes mushrooms, celery, and Worcestershire sauce. It’s divine. It is also extremely time sensitive and also somewhat expensive, making it a special occasion meatloaf. And, somehow, special occasion and meatloaf just don’t belong in the same sentence.

Anyway, of all the meatloaf recipes I’ve tried I’ve never made one with horseradish and I was mightily intrigued. 

It took me about half an hour to get the meatloaf prepped and into the oven, and I was able to prepare the mashed potatoes and lima beans while the meatloaf baked. The mashed potatoes were just average run-of-the-mill. I didn’t use a recipe. 

The lima bean recipe,  however, is also from my 1944 cookbook. I LOVE lima beans. I feel like lima beans are much maligned as a boring bean, not that there’s necessarily an exciting bean I suppose. But I do love them and usually eat them plain, maybe with a touch of salt and pepper for seasoning. Come to think of it, I don’t believe I’ve ever made a recipe out of lima beans. So, I was very excited to try this dish out.

I didn’t time myself making the lima beans, but I would say it took roughly 20 minutes from start to finish. I used frozen beans and microwaved them, so that cut down on the cook time. They were very, very easy to make. I also learned a new cooking term – bean liquor. Who knew? I always call the cooking liquid bean juice. Bean liquor is definitely a more sophisticated term than bean juice and is now firmly entrenched into my vernacular.  

Right at 60 minutes, the meatloaf was done as were the mashed potatoes and the lima beans. At first blush, the meatloaf looked…like it imploded. I was a little worried as I lifted it out of the pan and onto a plate. As I cut two slices for the Mister, the meatloaf started falling down like a brick wall without mortar. Yes, I realize it may have held together a bit better had I let it cool down for 15-20 minutes instead of 2. But we were hungry and I wanted to enjoy dinner while it was still hot. 

And the result?

After one bite of the lima beans, the first word out of the Mister’s mouth was “Wow!” followed immediately by another “wow” and “these are awesome!”.

And they were. The scallions gave a nice hint of onion flavor but were not overpowering. Lima beans, much as I love them, can be a bit flat but in this dish they were elevated to a new dimension. I’m not sure the paprika added much flavor but did lend a nice color to the – ahem – bean liquor that formed the sauce. Perfectly seasoned, creamy, and unique, this dish will most certainly make it into my permanent recipe file. The Mister and I each gave it 5/5 stars (my Maman did not try them). In fact, the recipe was supposed to serve 4-6 but the two of us devoured them all in one sitting – that in and of itself, should tell you how delicious they were. My dedicated carnivore husband loved them more than the meatloaf. 

Speaking of the meatloaf…

The meatloaf, as I mentioned, was so moist it fell apart. Nothing is worse than a dry meatloaf, and this recipe didn’t disappoint in that regard.

As to the taste, well, the results were a bit shocking. Who knew horseradish could be so controversial?

As a backstory, the Mister loves wasabi (and most wasabi sold in the USA is essentially green horseradish). My Maman hates horseradish. I like it, but it wouldn’t necessarily be the first condiment I reach for when I’m rooting around the refrigerator. That being said, my Maman and I loved the meatloaf. We both thought the horseradish gave the meatloaf a really nice flavor and voted it 5/5 stars. The Mister, on the other hand, said the meatloaf was good but the horseradish “just hangs on”. He said if I use the recipe again to skip the horseradish entirely. Then he got up and retrieved the ketchup bottle from the refrigerator. After squirting America’s favorite condiment on his meatloaf, he pronounced it better balanced and finished his serving. He did not go back for seconds of the meatloaf and voted it 3.5/5 stars. He also firmly declined the opportunity to take a meatloaf sandwich to work the next day. So perhaps 3.5 stars may have been pushing it.

Overall, I enjoyed dinner quite a bit. Regardless of what the Mister thought, I would personally make the meatloaf again exactly as it was written. And the lima beans? They were unequivocally the star of the show and I cannot wait to make them again soon.

I highly recommend both recipes and the dinner menu as a whole. 

Somerville Meatloaf

  • Servings: 6
  • Difficulty: easy
  • Print

Ingredients

  • 1 1/2 lbs. chuck beef, ground
  • 1/4 c. minced peeled onion
  • 1 1/3 c. fine soft bread crumbs
  • 2 teasp. salt
  • 1 egg
  • 4 teasp. bottled horseradish
  • 3/4 tsp dry mustard
  • 3 tablesp. minced green pepper
  • 3 tablesp. catchup
  • 1/2 c. bottled milk or 1/4 c. evaporated milk and 1/4 c. water

Directions

Mix all the ingredients, and turn into a greased or oiled 8 1/2″ x 4 1/2″ x 2 1/2″ loaf pan. Bake in a moderately hot oven of 400 F for 1 hr. Serves 6. For individual meat loaves, prepare as above. Then form into 6 individual loaves, arrange in a baking pan, and bake at 400 F for 30 min. 1/4 lb sausage meat may replace an equal amount of the ground beef.

Lima Beans and Scallions

  • Servings: 4-6
  • Difficulty: easy
  • Print

Ingredients

  • 2 c. shelled green lima beans
  • 6 scallions, thinly sliced
  • 2 tablesp. butter or margarine
  • 1 tablesp. flour
  • 1/4 teasp. paprika
  • 1/2 teasp. salt
  • speck pepper

Directions

Cook lima beans until tender. Drain, reserving 1/2 c. bean liquor. Simmer scallions in butter for 2 min; then stir in flour. Add bean liquor, and cook, stirring, until thickened. Add beans, remaining ingredients, and heat. Serves 4-6.

I used the entire scallion – both green and white parts.

Bon appetit!

1940's · 1944 · Appetizers · vintage recipes

Vintage Recipe: Ham and Olive Spread

Thanksgiving in the United States has come and gone and we are now firmly into the Christmas season. For a homemaker, the holiday season is a delight – baking scrumptious treats of all manner, trying new recipes, and creating menus for gatherings large and small. Of course, all of this cooking usually means one thing…leftovers!

Leftovers and our national holiday of unabashed gluttony go hand-in-hand. Even though we didn’t host Thanksgiving this year we still had leftovers – dearest sister-in-law graciously sent us home with an abundance of ham. While I don’t mind eating leftovers for several days in a row, the Mister will only abide the same meal for so long before the components absolutely must be transformed into a new dish. And that is precisely where we found ourselves last week. 

Normally, my absolute favorite leftover ham dish is Scalloped Potatoes and Ham but sadly lack of both preparation and energy meant that it was not a possible solution this time. Instead, I got out my 1944 Good Housekeeping Cook Book and selected a recipe that I thought would be excellent to try this time of year – Ham and Olive Spread. This recipe not only uses up leftover ham but is perfect for entertaining! Exactly the kind of budget-saving trick a good 1940’s homemaker would have employed during the rationing years and one we need to return to in these days of obscene inflation.

The spread came together very quickly with nothing but ingredients I always keep on hand (excepting, of course, the ham). The Mister diced the ham whilst I tackled the olives and we were ready to eat in no time flat. Obviously, this recipe was intended to be served as an appetizer and not a main course, but we chose to enjoy it as our dinner along with a few other leftover odds and ends. 

As to the taste?

The Worcestershire sauce was most certainly a predominant flavor in this dish. While the mayonnaise acted mostly as a binder, the Worcestershire sauce gave the spread a rich flavor that enhanced the ham. My husband and I both had the same assumption as we took our first bite: between the ham and the olives we expected this spread to be extraordinarily salty. And it wasn’t. At first. However, the more we ate, the saltier it got. The Mister commented that he could not eat this spread on a sandwich the way he would an ordinary ham salad. I agree. The recipe indicated it should be served with crackers and buttered bread. We tried both and it was definitely more enjoyable with the bread. 

If I were to serve this to guests, I would prepare it as a canape and serve it on a buttered, toasted baguette or rye or pumpernickel bread.

Overall, it was an easy and economical way to use leftover ham and I would consider making it again if I was entertaining and had an abundance of ham in the refrigerator. The saltiness of this spread means it’s not particularly enjoyable in large quantities but it would make a lovely addition to any cocktail party.

Ham and Olive Spread

Ingredients

  • 1/8 lb. minced, cooked ham (2/3 c)
  • 1/2 c. minced stuffed olives
  • 2 tablesp. minced parsley
  • 1 tablesp. Worcestershire sauce
  • 1/4 c. mayonnaise

Directions


Combine all ingredients and use as a spread on buttered or toasted bread, or crisp crackers.

Bon appetit!

1940's · main dishes · vintage recipes

Vintage Recipe: Tuna and Mushroom Casserole

After two beef recipes in a row, I decided to break out of the barnyard and try my hand at a vintage seafood recipe. After flipping through my 1944 Good Housekeeping Cook Book, I  selected Tuna and Mushroom Casserole for another weeknight meal. After all, what could be more quintessentially vintage than tuna casserole?

The first recipe for a tuna casserole is believed to have been published in 1930 with, as is usually the case, copycat versions soon to follow. In 1934 Campbell’s introduced their now world-famous condensed Cream of Mushroom soup and the popularity of tuna casserole soared. Prior to the introduction of Campbell’s concoction, tuna casseroles were made with a white sauce and, despite the widespread availability of canned cream of mushroom soup in 1944, this recipe is made using the original method. After making this recipe, I must say that I have a newfound appreciation for canned cream of mushroom soup.

The recipe itself was not altogether difficult to make, but it was more time consuming than I anticipated thanks to…the white sauce! Yes, I understand fully now why Campbell’s little creation was a game changer in the realm of tuna casseroles. 

Four recipes into the Good Housekeeping Cook Book and I have noticed a trend: while the cookbook is purported to be for basic home cooks, there are quite a few blanks to fill in and the authors made some heady assumptions about the skill level of their readers. Case in point, the instructions for the white sauce gave no details about the temperature to set the stove at. Hindsight being 20/20 and all, I realize that I initially cooked the white sauce at too low of a temperature. I knew enough not to set the hob on high, but evidently medium-low (on my stove, at least), wasn’t quite hot enough. Medium-high? That was the ticket. 

It took me exactly 40 minutes to get this casserole in the oven. Had I cooked the white sauce at the correct temperature, it likely would have taken half that time. But alas, 40 minutes it did take plus another 30 in the oven. An hour and ten minutes? Way, way too long for a weeknight supper. 

Naturally, however, no one minds waiting for dinner if it’s delicious. What did the Mister think? He said the recipe was a bit heavy, ironically enough, on the tuna. My Maman said she thought it would have tasted better with canned mushrooms. I thought it had a delicate flavor that perhaps was just a bit bland. Oddly enough, despite the ungodly amount of potato chips that were in this dish, it needed salt. Go figure.

Were I to make this recipe again, I would reduce the tuna by one can (the recipe called for a 13 ounce can. I used three, 4 ounce cans) and I would try my Maman’s suggested swap of the canned mushrooms. 

I served this Tuna and Mushroom Casserole with bread and butter. And an extra dry gin martini. Because sometimes a busy business housekeeper needs to relax after spending 40 minutes standing over a hot stove making white sauce following a long day in the office. 

Overall, 3.5/5 stars. 

Tuna and Mushroom Casserole

  • Servings: 6
  • Difficulty: easy
  • Print

Ingredients

  • 3 tablesp. butter or margarine
  • 1 tablesp. fat or salad oil
  • 4 tablesp. flour
  • ¼ teasp. pepper
  • 2 ¼ c. milk
  • 1, 3 ¾ oz pkg potato chips, crushed
  • 1, 13 oz can tuna fish, coarsely flaked (2 c.)
  • ¾ c. sauteed, sliced, fresh mushrooms

Directions


Melt butter and fat in double boiler; stir in flour and pepper; stir in milk gradually. Cook until smooth and thickened. Combine ¾ of the crushed potato chips, the fish, mushrooms, and the sauce. Pour into a greased 1 ½ qt. casserole; top with the rest of the crushed potato chips. Bake in a moderately hot oven of 375 F for 30 minutes. Serves 6.

What would a wartime home cook do? She would use what she had in her store cupboard instead of buying ingredients and that is precisely what I did. I used 3 cans of oil-packed yellowfin tuna and rehydrated so-called gourmet dried mushrooms. I also used rendered bacon fat and whole milk.

Suggested Variations: I would absolutely recommend the addition of either frozen or canned peas.

Bon appetit!

1944 · main dishes · vintage recipes

Vintage Recipe: Beef Upside-Down Pie

Well, I guess the old expression is true: two outta three ain’t bad.

My first two endeavors with 1944 cooking were extremely successful. The Swiss Cheese Pie was superb (although, update: the leftovers do not keep well) and the Baked Bean and Hamburger Savory was delectable. So to say I had high hopes for round three, Beef Upside-Down Pie, would be an understatement. Better luck next time, it seems.

First off, I must start by saying that I have made much worse dishes. Much. Oh the stories my poor family could tell about beet soup, tofu, and my now infamous “90 alarm chili” (turns out a few tablespoons of cayenne pepper is slightly too much. Oops). Thank goodness Beef Upside-Down Pie was not even close to those culinary disasters. In fact, the dish really wasn’t even bad. It just wasn’t great. 

That being said, Beef Upside-Down Pie was created with a very specific purpose in mind and it more than checked the box. 

This recipe was located within a section of the 1944 Good Housekeeping Cook Book entitled “Making Beef Go Farther” and gave the hint of combining meat with vegetables, rice, and breadstuff when meat is scarce. As meat was on the list of rationed foods in the United States from March of 1943 through November of 1945, these types of recipes were common in cookbooks and women’s magazines during the war years. Red stamps from Ration Book Two were used to purchase meat during this time and those over the age of 12 were allowed 2.5 pounds of meat a week. That means, in my household of three adults, we would be allotted 7.5 pounds of meat every 7 days. This recipe for Beef Upside-Down Pie called for just 1/2 of a pound of ground beef and served 4. 

Successful in stretching the meat ration? Absolutely. But taste? Well, the very component that allowed me to use so little meat was what made the recipe less tasty than it could have been and that was… the biscuit. 

The Mister, my Maman, and I all agreed that the biscuit was much too dry and there was way too much of it. In fact, we all came to the same conclusion: that the meat portion of the dish was quite good but the flavor was totally overwhelmed by the dryness and sheer volume of the biscuit. My husband commented that the “meat is good, when you can find it underneath all the bread.” 

While I was preparing the biscuit dough, I did take note of the amount of baking powder used and expected it to rise a fair amount, but three inches? Well, butter my biscuit. That was the equivalent of a small loaf of bread on top of a hamburger!

That being said, I would consider making this again with one major change: cut the recipe for the biscuit in half or even in thirds. That would balance the taste and allow the delicious juices from the pie to soak into the biscuit, making it much more palatable. 

As to time, it took exactly 30 minutes for me to get this into the oven and another 20 minutes to bake. 50 minutes was pushing it a little for a weeknight supper, but it was a simple recipe to make. 

All in all, this was a 2/5.

Beef Upside Down Pie

  • Servings: 4
  • Difficulty: easy
  • Print

Ingredients

  • 1 1/2 c. sifted all-purpose flour
  • 2 1/2 teasp. baking powder
  • 1 teasp. paprika
  • 1 teasp. celery salt
  • 1/4 teasp. pepper
  • 1 teasp. salt
  • 5 tablesp. shortening
  • 3/4 c. milk
  • 1/4 c. sliced, peeled onion
  • 1 can condensed tomato soup, undiluted
  • 1/2 lb. chuck beef, ground

Directions

Sift first 5 ingredients with 1/2 teasp. of salt. Cut in 3 tablesp. of shortening, until of consistency of coarse corn meal. Add milk. Meanwhile, cook onion tender in the remaining 2 tablesp. of shortening in a skillet. Add soup, the remaining 1/2 teasp. salt, and beef. Heat; then pour into a 8 5/8″ x 2″ round baking dish. Spread dough on top; bake in a very hot oven of 475 degrees F. for 20 min. or until biscuit is done. Serve upside down, cut in wedge-shaped pieces. Serves 4.


I made the recipe exactly as written, with no substitutions.

Bon appetit!

1944 · main dishes · vintage recipes

Vintage Recipe: Baked Bean and Hamburger Savory

“Wow! That’s really good!” 

That was The Mister’s reaction at taking his first bite of Baked Bean and Hamburger Savory – a vintage recipe from my 1944 Good Housekeeping Cook Book. 

Needless to say, this was music to my ears. As I’ve mentioned before, so many of the modern recipes I’ve tried over the last few years have fallen flat. Poor thing has had to suffer through many a bland meal. Frankly, I had gotten to the point where I didn’t even want to cook anymore, because I felt I spent so much time planning, shopping, preparing, and cooking dishes only for them to be flavorless at best or entirely inedible at worst (beet soup, here’s looking at you).

To be honest, I didn’t have particularly high hopes for this recipe. I wasn’t expecting it to be bad – I just wasn’t expecting it to be much more than an upgraded can of baked beans. What a very pleasant surprise, indeed!

After a few more bites, my husband said – not once but twice – “Man that’s GOOD!”. Then he put to words what I was thinking “I didn’t expect the flavor profile to be so complex.” And it was. Far, far more than just a can of humble baked beans this recipe had a wonderfully rich beef flavor that was surprising given the amount of beef (¾ of a pound) that was included. All of the other ingredients worked in perfect harmony to create a dish that was well balanced and robust. The texture was great, too. I cooked my dish in a cast iron pan and the crumbled beef got a wee bit crispy before the 10 minute cook time was up. Of course, I’m not sure if that was supposed to happen (as the instructions don’t elaborate) or if it was a happy accident. But it was delicious and I will crisp the beef again the next time I make it. Despite the beef to bean ratio being so heavily skewed towards the beans, there was little bit of beef in every bite. 

Beyond that, this was another superb weeknight dinner for a business housekeeper. Start to finish, I had this dish on the table in just 26 minutes. Like Swiss Cheese Pie from the prior evening, Baked Bean and Hamburger Savory was extraordinarily easy to make, a speedy weeknight super, easy on the budget, and most importantly, delicious. 

The beans added a nice heft to this dish, making it filling without being heavy. It was a great meal on a chilly Autumn evening. I served this with bread and butter and the last of the applesauce from the night before. 

The recipe serves 4. When I spotted The Mister’s roving eye scanning the kitchen to see if there was more, I knew that there would be no leftovers and that is the best endorsement. I will definitely be making this again and hope you give it a try yourself!

Baked Bean and Hamburger Savory

  • Servings: 4
  • Difficulty: easy
  • Print

Ingredients

  • 2 tablesp. fat or salad oil
  • ½ c. sliced onions
  • ⅔ c. diced celery
  • ½ lb chuck beef, ground
  • 2 ⅔ c. baked beans or cooked kidney beans
  • 2 teasp. Worcestershire sauce
  • ¾ teasp. salt
  • ¾ teasp. powdered sage
  • ¾ c. water or canned tomato juice

Directions


Heat the fat in a skillet. Then add the onions, celery, and beef, and cook, uncovered about 10 min. Add rest of ingredients; heat thoroughly. Serves 4.


For this recipe, I used rendered bacon fat as my fat/oil, original recipe commercially prepared baked beans, and tomato juice. I substituted the sage for dried thyme, as my Maman does not like sage.

Bon appetit!

1944 · main dishes · vintage recipes

Vintage Recipe: Swiss Cheese Pie

After months of haphazardly flipping through my 1944 Good Housekeeping Cookbook, I finally began my vintage culinary journey and started cooking. 

For my first foray, I intentionally chose a recipe that was quick, easy, and contained ingredients that are still readily available. I know from my aforementioned haphazard flipping that I am going to have my work cut out for me finding more than a few ingredients in the cookbook. Bottled thick meat sauce? India relish? Suckling pig? Best not to set oneself up for failure at the get go, I reckoned. 

Beyond that, I am what the cookbook so graciously calls a “Business Housekeeper”, meaning I work outside the home and am tasked with “preparing dinner without delay after (I) get home from the office at night.” I made this recipe on a weeknight and was able to have it in the oven in just 17 minutes. I imagine this recipe was popular in 1944, when women held a full third of all manufacturing jobs in the USA and the female labor force had increased by 50% over the pre-war years. If Rosie the Riveter can work in a factory all day and get a hot meal on the table at night, so can I. We can do it, ladies! Grandma didn’t have DoorDash, after all. 

So, Swiss Cheese Pie. I’ve already mentioned the speed in which I prepared this dish but what are some of the other highlights? It was relatively inexpensive for one, and contained just eight ingredients, half of which were seasonings that are staples in a well-stocked store cupboard. The other four ingredients – bread, milk, cheese, and eggs – are all what I consider to be multi-purpose ingredients and will provide the basis for other meals later in the week. 

Of course, a speedy and budget friendly meal is only worthwhile if it’s tasty. The verdict? The Mister gave it 4.5/5 stars. My Maman gave it 5/5. What did I think? I enjoyed it. It was a light dish with an almost custard-like or souffle-esque consistency and most definitely lighter than a standard quiche. Much to my delight the predominant flavor was, in fact, the swiss cheese. I find in many modern recipes that there are so many competing herbs, spices, and other ingredients that the dishes end up tasting like…well, not much of anything specific. But with this Swiss Cheese Pie, the cheese shone through in a perfectly balanced way. I served the pie with a simple salad of mixed greens, cucumber, and tomato tossed in French dressing and a side of applesauce. It was the perfect weeknight supper – hot, fast, and filling with one slice leftover for luncheon the next day. 

I would definitely make this again and hope you give it a try yourself.

Swiss Cheese Pie

  • Servings: 4-5
  • Difficulty: easy
  • Print

Ingredients

  • 1 qt bread or toast cubes (6 or 7 slices)
  • ½ lb grated processed Swiss cheese (2c.)
  • 2 eggs, beaten
  • ½ tsp salt
  • ½ tsp paprika
  • ¼ tsp dry or prepared mustard
  • ⅛ tsp pepper
  • 1 ½ c. bottled milk or ¾ c. evaporated milk and ¾ c. water

Directions

Place bread cubes in an ungreased 9” oven glass pie plate or shallow baking dish. Cover with the grated cheese. Combine beaten eggs, seasonings, and milk, and pour over the cheese and bread. Bake in a moderate oven of 350° F. for 30 min., or until puffed and lightly browned. Serves 4-5.

I used 6 slices of generic, store-brand white sandwich bread, standard Swiss cheese (as I don’t believe processed Swiss cheese is still manufactured – at least I could not locate it), dry mustard, and whole milk. I baked my pie for about 35 minutes.

Suggested Variations: If you have a miniscule amount of leftover ham, it would make a lovely addition to this pie if diced very small. Canned mushrooms would also work nicely – just be sure to drain them very well so as not to throw off the bread to liquid ratio.

Bon appetit!

1944

Let’s Travel Back in Time

There is a song (the title of which I will not name here because, frankly, it’s quite vulgar), popular in the late 1990’s, that opens with the line “I hate the world today”. 

So many times I feel that way and then quickly admonish myself. Hate, as our mothers all told us, is a strong word. But then again, the Oxford English dictionary defines hate as:

“To feel intense or passionate dislike.”

Passionate dislike. Yes, that’s exactly how I feel about the 21st century and its third decade. And passionate dislike has a much more elegant and ladylike ring to it than hate. Talk about vulgar.

I digress.

I’ve always felt I was born in the wrong era. I don’t particularly enjoy today’s fashion, music, movies, or much else to be frank. I have always been fascinated by the heyday of my grandparents’ generation, the exquisitely named Greatest Generation – specifically the 1940’s through the early 1960’s. 

Now, before I go any further please allow me a moment to state emphatically that I am fully aware that the era I just mentioned was not without tribulations. I do not romanticize it. The world during that period was filled with unbelievable turmoil, sadness, and despair. But, of course, today in many ways is no different. Same song, different tune. 

I am also aware that the modern society I so passionately dislike does have its advantages. 80 years ago, sitting at a desk, writing, and then sending that missive out around the world INSTANTLY was entirely impossible. The wealth of knowledge at our fingertips now is unprecedented and easily attainable for nearly anyone who has a passion to learn. 

That all being said, I am an old soul and always have been. I am also a student of history and believe that the lessons to be learned from the “good old days” have immense value. 

So, specifically, what inspired this blog?

A few months back I was browsing in a local antique store and happened upon a cookbook. The Good Housekeeping Cookbook, 7th revision, published in 1944 and in excellent condition. Like a moth to a flame, I was drawn to it and started flipping through it, absolutely riveted. Instantly, I thought of the cookbook I learned to cook with – my Maman’s battered and well-used copy of Betty Crocker’s New Picture Cookbook from 1961. 

Filled not with just recipes, but also practical advice on homemaking, marketing, meal planning, and more, the Good Housekeeping Cookbook offered a wealth of knowledge and insight into wartime home life in the United States. And with our modern economy in shambles and inflation through the roof, who couldn’t use a few tips on how to stretch a grocery budget while still living an elegant and well-curated life? 

So of course, I purchased the book. Took it home and stored it safely in my antique secretary (also from the 1940’s). And there it sat for a few months, mostly untouched but for a few peeks here and there coupled with several fleeting thoughts of how I really should select a recipe and give it a go. 

Then, my Aunt arrived for a visit. Said Aunt is an excellent cook. My husband much prefers her cooking to anything I make. And during her visit she got out a cookbook filled with recipes her mother (my grandmother) used to make. They were a big hit. After her departure, my husband looked through the cookbook and requested I make a dish that was one of my grandpa’s favorites: Spaghetti-Meatloaf.

I’d never had it. My Maman never made it, as she never liked it. So, I gathered the ingredients, put on my apron, and started cooking. It was delicious. It was inexpensive, nutritionally balanced, and relatively easy to make.  Most importantly, my leftover averse Mister happily ate it again the next night. Even my Maman liked it. 

Well, the lightbulb went off. I’ve very much felt lately like everything I cook using contemporary recipes and modern ingredients ends up being absolute rubbish, yet this old recipe turned out great. So I decided the day had to come to see what 1944’s Good Housekeeping could teach me. I thought it would be fun to cook my way through this vintage tome and share my experiences with you. 

And, as so many thoughts do, the idea got bigger and I thought it would do my old-lady soul good to write about all things from the decades that have been a lifelong fascination. 

The next January 1st we see will usher in the year 2024. That will be 80 years since my Good Housekeeping Cookbook was published. 80 years, in the context of humanity, is not a terribly long time. And yet the changes we’ve experienced have dramatically shifted life in the West, some for the better and some – many – for the worse. 

Consider this your invitation to come time-traveling with me. Back to a day when “farm to table” wasn’t a trendy catchphrase, but was an accurate description of how folks actually ate. Back to a day when the radio didn’t have to bleep out half the lyrics in a song. Back to a day when grocery shopping in your pajamas wasn’t even a consideration, let alone the norm. Back to a day when holes in your clothes were patched, not created intentionally in the name of fashion. Back to a day when “ladies and gentlemen” wasn’t just a way to start a speech but an ideal for how to behave. Back to a day when certain subjects simply weren’t discussed in polite company. Back to a day when respect, faith, community, and loyalty were the bedrocks of society. Back to the good old days. 

Back to 1944…