There are several recipes in my 1944 Good Housekeeping cookbook that immediately intrigued me the very first time I flipped through it. The Apple Cheese Crisp I made a while back was one of said recipes, as was the recipe I tried today: Mushroom Shrimp Bisque.
Right off the bat, this recipe ticked all the boxes for me: mushrooms? Yes, please. Shrimp? Sign me up. Soup? Always. To boot, the recipe looked extremely simple and quick to get on the table during a busy week at the office. But the real kicker was the unique nature of the recipe. Located in a section of the cookbook that focused on combining two different canned ingredients to make a new dish, I thought the recipe for Mushroom Shrimp Bisque sounded creative and I could not wait to try it.
Easy? Absolutely. The hardest part of this recipe was finding my can opener in the Kitchen Drawer from Hell. Fast? Without a doubt. I had this recipe done and on the table in less than 10 minutes. Now that’s what I call an ideal weeknight supper! This is GREAT, I thought to myself and I could not wait to dip my spoon into the bowl.
As I ladled the soup and delivered it to the table, I could tell the Mister and my Maman were not quite as enthusiastic as I was. “THAT’S what we’re having for dinner??”, the Mister asked. “What’s in here?”, asked my Maman. I excitedly shared the name of the recipe and we all took our first bite.
The glances at the dinner table told the tale. There was no immediate reaction of “wow!” or even furrowed brows whilst we decided if we enjoyed the soup or not. There was silence.
The Mister, brave former Marine that he is, piped up first with “it doesn’t really have any flavor, does it?” My Maman quickly agreed that it was very, very bland. Staunch defender of my own cooking that I am, even I couldn’t put a positive spin on this one. What a disappointment.
So what DID it taste like? Well, frankly, it tasted like a warm bowl of milk with things floating in it. Actually, plain warm milk probably would have been better. The soup lacked any taste of mushroom or shrimp. None of us could discern any hint of tabasco, onion, or sherry either. To say it was an unsatisfying supper would be an understatement. It was very, very bland. In fact I commented that it would be a nice soup for someone requiring a bland diet.
If you do happen to have a medical condition that requires you drop a few pounds and eat a bland diet, nutritionally this soup isn’t bad: in just 77 calories you get 50% of your daily vitamin D needs as well as over 5 grams of protein. Normally I don’t do a nutritional analysis of the recipes I try, but I’m trying to make lemonade here!
That all being said, I appreciate the recipe for what it was – a creative way for a woman to feed her family a nutritious meal on a tight budget during a time of war and food rationing. If it was 1944 and this was my dinner, I would have been mighty glad to have had it.
1 ½ c. bottled milk or ¾ c. evaporated milk and ¾ c. water
1 c. canned or cooked shrimp
Dash tabasco sauce
1 teasp. minced onion or chives
1 to 1 1/2 tablesp. sherry (optional)
Directions
Stir together the mushroom soup, milk, and shrimp, which have been flaked after removal of the black vein down the back. Then add the tabasco and onion, and heat well but do not boil. Just before serving, add the sherry if desired. Serves 6.
I used canned shrimp for this recipe, draining the liquid as a treat for the cat. He refused it. I should have known.
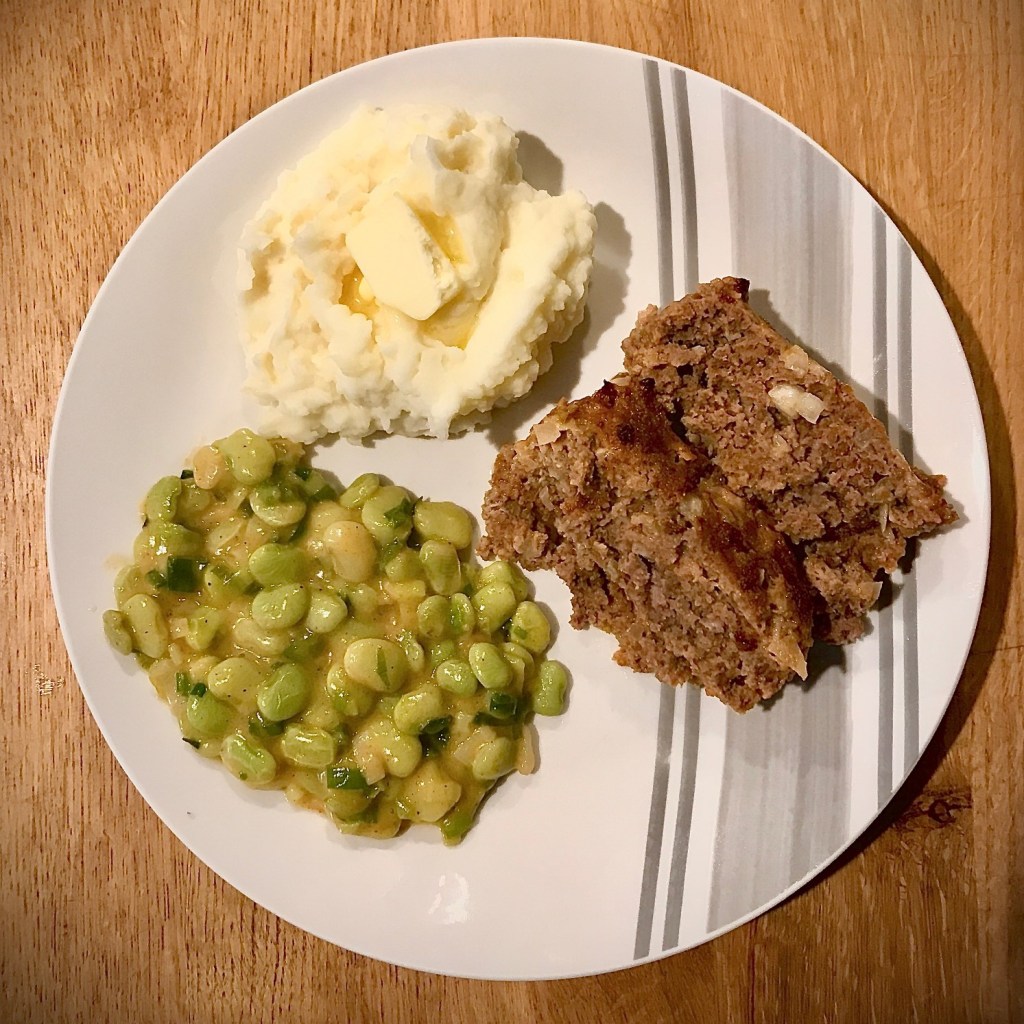
Winter is still in full swing here in the United States and after feeling a bit under the weather for the better part of a month, I decided some good old-fashioned comfort food was in order.
I asked The Mister what he was craving and all I got was “meat” as a response. Pressing harder, he narrowed it down to beef so I set off in search of a relatively quick dinner – so many of the beef recipes in my Good Housekeeping cookbook take quite a long time. There is one recipe in particular (involving, beef, bacon and dill pickles) that I am especially intrigued by, however it takes a full 2 hours of simmering time and a busy business housekeeper just can’t pull that off during the week.
So, I gave the Mister three options – Beef Curry, which he vetoed; Creamed Beef on Toast, which he so eloquently referred to by its military nickname of S**t on a Shingle; and meatloaf. He enthusiastically chose the meatloaf, so meatloaf it was. Not quite as quick of a turnaround time as I had hoped, but we still managed to eat at a respectable hour.
I, of course, have made many a meatloaf in my day and tried many recipes – sometimes I’ve used no recipe at all. Meatloaf’s saving grace is that it’s pretty darn hard to screw up. Even a “bad” meatloaf is usually still salvageable with the right condiments. One of my favorite recipes for meatloaf comes from a famous YouTube chef and includes mushrooms, celery, and Worcestershire sauce. It’s divine. It is also extremely time sensitive and also somewhat expensive, making it a special occasion meatloaf. And, somehow, special occasion and meatloaf just don’t belong in the same sentence.
Anyway, of all the meatloaf recipes I’ve tried I’ve never made one with horseradish and I was mightily intrigued.
It took me about half an hour to get the meatloaf prepped and into the oven, and I was able to prepare the mashed potatoes and lima beans while the meatloaf baked. The mashed potatoes were just average run-of-the-mill. I didn’t use a recipe.
The lima bean recipe, however, is also from my 1944 cookbook. I LOVE lima beans. I feel like lima beans are much maligned as a boring bean, not that there’s necessarily an exciting bean I suppose. But I do love them and usually eat them plain, maybe with a touch of salt and pepper for seasoning. Come to think of it, I don’t believe I’ve ever made a recipe out of lima beans. So, I was very excited to try this dish out.
I didn’t time myself making the lima beans, but I would say it took roughly 20 minutes from start to finish. I used frozen beans and microwaved them, so that cut down on the cook time. They were very, very easy to make. I also learned a new cooking term – bean liquor. Who knew? I always call the cooking liquid bean juice. Bean liquor is definitely a more sophisticated term than bean juice and is now firmly entrenched into my vernacular.
Right at 60 minutes, the meatloaf was done as were the mashed potatoes and the lima beans. At first blush, the meatloaf looked…like it imploded. I was a little worried as I lifted it out of the pan and onto a plate. As I cut two slices for the Mister, the meatloaf started falling down like a brick wall without mortar. Yes, I realize it may have held together a bit better had I let it cool down for 15-20 minutes instead of 2. But we were hungry and I wanted to enjoy dinner while it was still hot.
And the result?
After one bite of the lima beans, the first word out of the Mister’s mouth was “Wow!” followed immediately by another “wow” and “these are awesome!”.
And they were. The scallions gave a nice hint of onion flavor but were not overpowering. Lima beans, much as I love them, can be a bit flat but in this dish they were elevated to a new dimension. I’m not sure the paprika added much flavor but did lend a nice color to the – ahem – bean liquor that formed the sauce. Perfectly seasoned, creamy, and unique, this dish will most certainly make it into my permanent recipe file. The Mister and I each gave it 5/5 stars (my Maman did not try them). In fact, the recipe was supposed to serve 4-6 but the two of us devoured them all in one sitting – that in and of itself, should tell you how delicious they were. My dedicated carnivore husband loved them more than the meatloaf.
Speaking of the meatloaf…
The meatloaf, as I mentioned, was so moist it fell apart. Nothing is worse than a dry meatloaf, and this recipe didn’t disappoint in that regard.
As to the taste, well, the results were a bit shocking. Who knew horseradish could be so controversial?
As a backstory, the Mister loves wasabi (and most wasabi sold in the USA is essentially green horseradish). My Maman hates horseradish. I like it, but it wouldn’t necessarily be the first condiment I reach for when I’m rooting around the refrigerator. That being said, my Maman and I loved the meatloaf. We both thought the horseradish gave the meatloaf a really nice flavor and voted it 5/5 stars. The Mister, on the other hand, said the meatloaf was good but the horseradish “just hangs on”. He said if I use the recipe again to skip the horseradish entirely. Then he got up and retrieved the ketchup bottle from the refrigerator. After squirting America’s favorite condiment on his meatloaf, he pronounced it better balanced and finished his serving. He did not go back for seconds of the meatloaf and voted it 3.5/5 stars. He also firmly declined the opportunity to take a meatloaf sandwich to work the next day. So perhaps 3.5 stars may have been pushing it.
Overall, I enjoyed dinner quite a bit. Regardless of what the Mister thought, I would personally make the meatloaf again exactly as it was written. And the lima beans? They were unequivocally the star of the show and I cannot wait to make them again soon.
I highly recommend both recipes and the dinner menu as a whole.
1/2 c. bottled milk or 1/4 c. evaporated milk and 1/4 c. water
Directions
Mix all the ingredients, and turn into a greased or oiled 8 1/2″ x 4 1/2″ x 2 1/2″ loaf pan. Bake in a moderately hot oven of 400 F for 1 hr. Serves 6. For individual meat loaves, prepare as above. Then form into 6 individual loaves, arrange in a baking pan, and bake at 400 F for 30 min. 1/4 lb sausage meat may replace an equal amount of the ground beef.
Cook lima beans until tender. Drain, reserving 1/2 c. bean liquor. Simmer scallions in butter for 2 min; then stir in flour. Add bean liquor, and cook, stirring, until thickened. Add beans, remaining ingredients, and heat. Serves 4-6.
I used the entire scallion – both green and white parts.
I can’t believe it’s been over a month since I cooked from my 1944 Good Housekeeping Cook Book. Oh, I’ve thought about it numerous times…opened my vintage tome and perused the pages in search of an inspiring recipe. Yet, despite my good intentions nothing made it off the page and into our hungry bellies. You know what they say about good intentions. Well, turns out the road to the fast food drive thru is paved with them as well.
In my defense, it’s been quite a hectic month: my belle-mere came for a 3 week visit, instead of our two front teeth we all got Covid for Christmas, storms blew through that managed to knock out both our power and the internet, and amongst all of that this business housekeeper managed to find herself a brand spanking new job. Excuses, all of them, but there we have it. No use crying over spilt milk. Get back on the horse, they say, and so I did.
For my first experiment with mid-century cooking in 2024, I decided to make not one but two dishes. It’s unseasonably cold where I live and I was craving something comforting, something warm, and something stick-to-your-ribs. I had seen both of the recipes I chose to make during my first flip-through of the cookbook and have been anxiously awaiting the perfect time to make them. Thanks to Old Man Winter, the opportunity finally presented itself.
For the main course, I made Tuna Stuffed Peppers. I love traditional stuffed peppers. I also love tuna. So I thought this dish would be delicious and I wasn’t wrong.
From start to finish, it took an hour and half to get this on the table – an hour of prep and a half hour in the oven. The recipe calls for cooked diced potatoes and had I a can or two of potatoes lying around, the prep time would have been cut down by at least 15 minutes. But alas, I had no canned potatoes. I did, however, have 5 pounds of formerly fresh spuds sprouting eyes that needed to be used yesterday. So remembering the old saying “Use it up, wear it out, make it do, or do without”, I happily peeled, diced, measured, and boiled my potatoes.
Overall, the recipe was very straightforward and easy to make. I learned from my past tuna-related white sauce fiasco and cranked the heat when I made the sauce this time and it came together properly, thank goodness. I stuffed the peppers and put them in a 8×8 glass casserole dish, setting them aside whilst I made dessert.
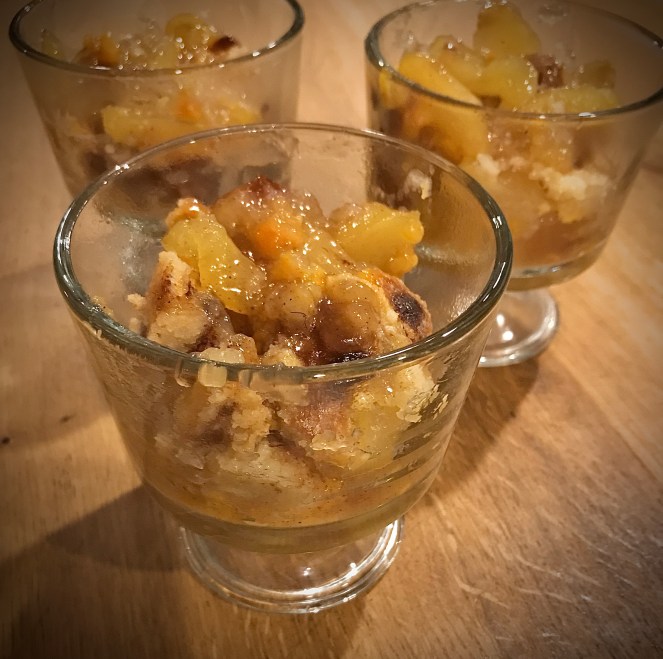
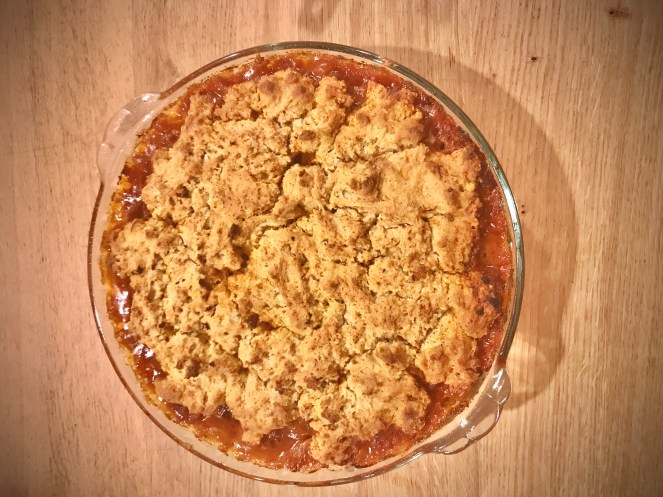
For dessert, I selected Apple-Cheese Crisp. I’ve made many a fruit crisp in my day, but this one was intriguing due to the addition of cheese. Of course, apple pie and cheddar cheese have long been a dynamic duo – sitting side by side on the dessert plate, not necessarily baking in the same dish. I was very excited to try this.
The Apple-Cheese Crisp took just over 20 minutes to get oven ready and, again, was very easy to make. The recipe serves 6-7, and it was just us three for dinner so I halved the recipe and the portions were perfect with no leftovers.
A delightful surprise, the peppers and the dessert both required baking at 350 so I put them in the oven at the same time. The peppers required 30 minutes to bake and the crisp, an hour. The timing was perfect. By the time we were done with dinner, the Mister had just enough time to do the dinner dishes before the apple crisp came out of the oven.
As to the dishes, I am happy to report that they were both delicious!
The Tuna Stuffed Peppers were just rich and filling enough to be comforting on a cold, winter’s evening without being overly heavy. At first taste they seemed to need salt, but after eating a few more bites it became apparent that they were perfectly seasoned. My Maman gave the dish 4/5, knocking off one star because she doesn’t like green peppers. She thought the filling tasted like a tuna casserole, except stuffed in a pepper. I agree. The peppers themselves gave just a hint of flavor to the tuna stuffing and provided a nice balance. I particularly enjoyed the potatoes – I thought that they not only bumped up the nutrition of the dish but gave a nice flavor as well (as opposed to the standard egg noodles found in traditional tuna casseroles). I would definitely make this dish again.
And what did The Mister think?
He, too liked the dish and gave it 4/5. So what caused him to withhold the final point?
In my very first Dispatch I mentioned Dearest Aunt, who is a cooking legend in our family and whose last visit to our home and whose love of old recipes partially inspired this blog. Dearest Aunt and The Mister share a mutual affection – she likes to feed him and he LOVES to eat her cooking. Her stuffed pepper recipe (which bears no similarity to this one) is one of his favorite things to eat. So when reviewing his adoring wife’s attempt at stuffed peppers, The Mister commented: “I gave it 4/5 stars only because it’s not Dearest Aunt’s. Dearest Aunt has ruined me for stuffed peppers.”
So there you have it.
On cue, the oven timer went off and the Apple-Cheese Crisp was ready. I was hopeful it would taste as good as it smelled and I was not disappointed.
After one bite, The Mister’s eyebrows went up and he said “Wow!”. My favorite reaction, of course. After the second bite he furrowed his brow and asked what was in the dish. Needless to say, he was gobsmacked when I told him it was cheese.
My Maman loved it as well. She said it was like apple pie, but with a surprise. She gave it 5/5.
The Mister gave it 4.5/5, explaining that he’s “not a huge apple dessert guy. The cheese saved it from being torturous to eat.” He was in rare form, to be sure.
I enjoyed it quite a bit as well. I love fruit pies, but pie crust is my sworn enemy. As a result, I have grown to appreciate the simplicity of crumbles, crisps, and cobblers. This recipe was very easy to make and tasted like a good apple pie without all of the frustration and foul language. Ahem.
Overall, I was pleased as punch with my dinner and would gladly make both dishes again.
Wash peppers; cut off tops, and remove seeds. Cook in boiling salted water for 10 min.; drain. Combine potatoes and tuna, broken into chunks. Melt the butter in a saucepan. Add flour, salt, pepper, and celery seeds and stir smooth; add milk gradually, while stirring, and cook until thickened. Add to potato-tuna mixture, and blend. Fill peppers with this mixture, and top with bread crumbs combined with cheese. Bake in moderate oven of 350 F for 30 minutes. Serves 4.
I didn’t have celery seeds on hand and replaced the salt and celery seeds with 1/2 teaspoon of celery salt. Tuna, at least in my local shops, no longer comes in 7 oz cans so I used 2 standard sized cans of tuna packed in water.
1/4 lb processed American Cheddar cheese, grated (1 c.)
Directions
Arrange apples in greased, shallow baking dish about 10″ x 6″ x 2″. Sprinkle with cinnamon. Pour lemon juice and corn syrup over apples. Combine sugar, flour, and salt; cut in butter until mixture is consistency of coarse corn meal. Lightly stir in cheese. Top apples with this mixture. Bake, uncovered, in moderate oven of 350 F for 1 hr., or until apples are very tender. Serve warm, with or without cream. Serves 6-7.
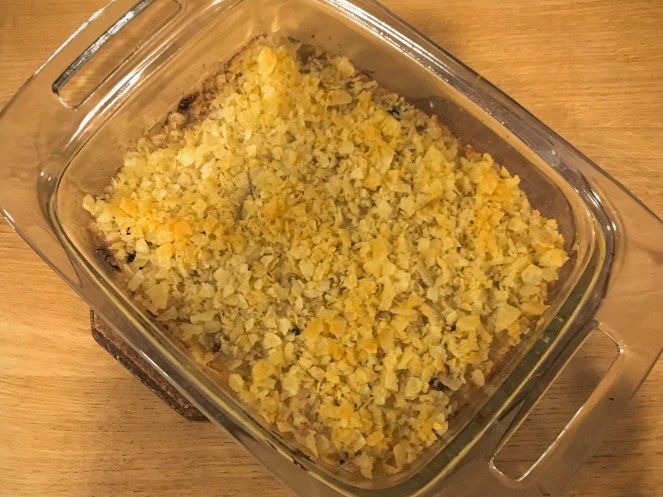
After two beef recipes in a row, I decided to break out of the barnyard and try my hand at a vintage seafood recipe. After flipping through my 1944 Good Housekeeping Cook Book, I selected Tuna and Mushroom Casserole for another weeknight meal. After all, what could be more quintessentially vintage than tuna casserole?
The first recipe for a tuna casserole is believed to have been published in 1930 with, as is usually the case, copycat versions soon to follow. In 1934 Campbell’s introduced their now world-famous condensed Cream of Mushroom soup and the popularity of tuna casserole soared. Prior to the introduction of Campbell’s concoction, tuna casseroles were made with a white sauce and, despite the widespread availability of canned cream of mushroom soup in 1944, this recipe is made using the original method. After making this recipe, I must say that I have a newfound appreciation for canned cream of mushroom soup.
The recipe itself was not altogether difficult to make, but it was more time consuming than I anticipated thanks to…the white sauce! Yes, I understand fully now why Campbell’s little creation was a game changer in the realm of tuna casseroles.
Four recipes into the Good Housekeeping Cook Book and I have noticed a trend: while the cookbook is purported to be for basic home cooks, there are quite a few blanks to fill in and the authors made some heady assumptions about the skill level of their readers. Case in point, the instructions for the white sauce gave no details about the temperature to set the stove at. Hindsight being 20/20 and all, I realize that I initially cooked the white sauce at too low of a temperature. I knew enough not to set the hob on high, but evidently medium-low (on my stove, at least), wasn’t quite hot enough. Medium-high? That was the ticket.
It took me exactly 40 minutes to get this casserole in the oven. Had I cooked the white sauce at the correct temperature, it likely would have taken half that time. But alas, 40 minutes it did take plus another 30 in the oven. An hour and ten minutes? Way, way too long for a weeknight supper.
Naturally, however, no one minds waiting for dinner if it’s delicious. What did the Mister think? He said the recipe was a bit heavy, ironically enough, on the tuna. My Maman said she thought it would have tasted better with canned mushrooms. I thought it had a delicate flavor that perhaps was just a bit bland. Oddly enough, despite the ungodly amount of potato chips that were in this dish, it needed salt. Go figure.
Were I to make this recipe again, I would reduce the tuna by one can (the recipe called for a 13 ounce can. I used three, 4 ounce cans) and I would try my Maman’s suggested swap of the canned mushrooms.
I served this Tuna and Mushroom Casserole with bread and butter. And an extra dry gin martini. Because sometimes a busy business housekeeper needs to relax after spending 40 minutes standing over a hot stove making white sauce following a long day in the office.
Melt butter and fat in double boiler; stir in flour and pepper; stir in milk gradually. Cook until smooth and thickened. Combine ¾ of the crushed potato chips, the fish, mushrooms, and the sauce. Pour into a greased 1 ½ qt. casserole; top with the rest of the crushed potato chips. Bake in a moderately hot oven of 375 F for 30 minutes. Serves 6.
What would a wartime home cook do? She would use what she had in her store cupboard instead of buying ingredients and that is precisely what I did. I used 3 cans of oil-packed yellowfin tuna and rehydrated so-called gourmet dried mushrooms. I also used rendered bacon fat and whole milk.
Suggested Variations: I would absolutely recommend the addition of either frozen or canned peas.
Well, I guess the old expression is true: two outta three ain’t bad.
My first two endeavors with 1944 cooking were extremely successful. The Swiss Cheese Pie was superb (although, update: the leftovers do not keep well) and the Baked Bean and Hamburger Savory was delectable. So to say I had high hopes for round three, Beef Upside-Down Pie, would be an understatement. Better luck next time, it seems.
First off, I must start by saying that I have made much worse dishes. Much. Oh the stories my poor family could tell about beet soup, tofu, and my now infamous “90 alarm chili” (turns out a few tablespoons of cayenne pepper is slightly too much. Oops). Thank goodness Beef Upside-Down Pie was not even close to those culinary disasters. In fact, the dish really wasn’t even bad. It just wasn’t great.
That being said, Beef Upside-Down Pie was created with a very specific purpose in mind and it more than checked the box.
This recipe was located within a section of the 1944 Good Housekeeping Cook Book entitled “Making Beef Go Farther” and gave the hint of combining meat with vegetables, rice, and breadstuff when meat is scarce. As meat was on the list of rationed foods in the United States from March of 1943 through November of 1945, these types of recipes were common in cookbooks and women’s magazines during the war years. Red stamps from Ration Book Two were used to purchase meat during this time and those over the age of 12 were allowed 2.5 pounds of meat a week. That means, in my household of three adults, we would be allotted 7.5 pounds of meat every 7 days. This recipe for Beef Upside-Down Pie called for just 1/2 of a pound of ground beef and served 4.
Successful in stretching the meat ration? Absolutely. But taste? Well, the very component that allowed me to use so little meat was what made the recipe less tasty than it could have been and that was… the biscuit.
The Mister, my Maman, and I all agreed that the biscuit was much too dry and there was way too much of it. In fact, we all came to the same conclusion: that the meat portion of the dish was quite good but the flavor was totally overwhelmed by the dryness and sheer volume of the biscuit. My husband commented that the “meat is good, when you can find it underneath all the bread.”
While I was preparing the biscuit dough, I did take note of the amount of baking powder used and expected it to rise a fair amount, but three inches? Well, butter my biscuit. That was the equivalent of a small loaf of bread on top of a hamburger!
That being said, I would consider making this again with one major change: cut the recipe for the biscuit in half or even in thirds. That would balance the taste and allow the delicious juices from the pie to soak into the biscuit, making it much more palatable.
As to time, it took exactly 30 minutes for me to get this into the oven and another 20 minutes to bake. 50 minutes was pushing it a little for a weeknight supper, but it was a simple recipe to make.
Sift first 5 ingredients with 1/2 teasp. of salt. Cut in 3 tablesp. of shortening, until of consistency of coarse corn meal. Add milk. Meanwhile, cook onion tender in the remaining 2 tablesp. of shortening in a skillet. Add soup, the remaining 1/2 teasp. salt, and beef. Heat; then pour into a 8 5/8″ x 2″ round baking dish. Spread dough on top; bake in a very hot oven of 475 degrees F. for 20 min. or until biscuit is done. Serve upside down, cut in wedge-shaped pieces. Serves 4.
I made the recipe exactly as written, with no substitutions.
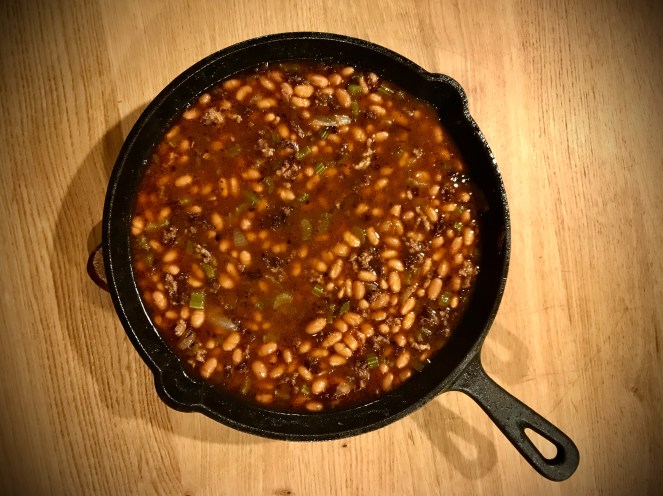
That was The Mister’s reaction at taking his first bite of Baked Bean and Hamburger Savory – a vintage recipe from my 1944 Good Housekeeping Cook Book.
Needless to say, this was music to my ears. As I’ve mentioned before, so many of the modern recipes I’ve tried over the last few years have fallen flat. Poor thing has had to suffer through many a bland meal. Frankly, I had gotten to the point where I didn’t even want to cook anymore, because I felt I spent so much time planning, shopping, preparing, and cooking dishes only for them to be flavorless at best or entirely inedible at worst (beet soup, here’s looking at you).
To be honest, I didn’t have particularly high hopes for this recipe. I wasn’t expecting it to be bad – I just wasn’t expecting it to be much more than an upgraded can of baked beans. What a very pleasant surprise, indeed!
After a few more bites, my husband said – not once but twice – “Man that’s GOOD!”. Then he put to words what I was thinking “I didn’t expect the flavor profile to be so complex.” And it was. Far, far more than just a can of humble baked beans this recipe had a wonderfully rich beef flavor that was surprising given the amount of beef (¾ of a pound) that was included. All of the other ingredients worked in perfect harmony to create a dish that was well balanced and robust. The texture was great, too. I cooked my dish in a cast iron pan and the crumbled beef got a wee bit crispy before the 10 minute cook time was up. Of course, I’m not sure if that was supposed to happen (as the instructions don’t elaborate) or if it was a happy accident. But it was delicious and I will crisp the beef again the next time I make it. Despite the beef to bean ratio being so heavily skewed towards the beans, there was little bit of beef in every bite.
Beyond that, this was another superb weeknight dinner for a business housekeeper. Start to finish, I had this dish on the table in just 26 minutes. Like Swiss Cheese Pie from the prior evening, Baked Bean and Hamburger Savory was extraordinarily easy to make, a speedy weeknight super, easy on the budget, and most importantly, delicious.
The beans added a nice heft to this dish, making it filling without being heavy. It was a great meal on a chilly Autumn evening. I served this with bread and butter and the last of the applesauce from the night before.
The recipe serves 4. When I spotted The Mister’s roving eye scanning the kitchen to see if there was more, I knew that there would be no leftovers and that is the best endorsement. I will definitely be making this again and hope you give it a try yourself!
Heat the fat in a skillet. Then add the onions, celery, and beef, and cook, uncovered about 10 min. Add rest of ingredients; heat thoroughly. Serves 4.
For this recipe, I used rendered bacon fat as my fat/oil, original recipe commercially prepared baked beans, and tomato juice. I substituted the sage for dried thyme, as my Maman does not like sage.
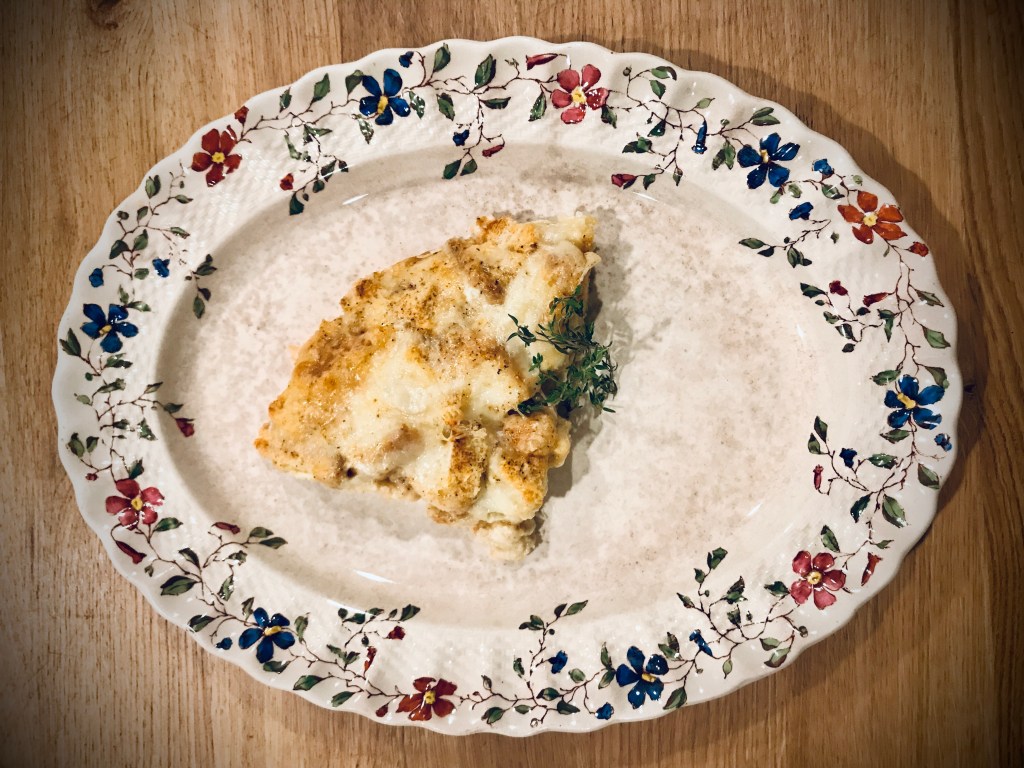
After months of haphazardly flipping through my 1944 Good Housekeeping Cookbook, I finally began my vintage culinary journey and started cooking.
For my first foray, I intentionally chose a recipe that was quick, easy, and contained ingredients that are still readily available. I know from my aforementioned haphazard flipping that I am going to have my work cut out for me finding more than a few ingredients in the cookbook. Bottled thick meat sauce? India relish? Suckling pig? Best not to set oneself up for failure at the get go, I reckoned.
Beyond that, I am what the cookbook so graciously calls a “Business Housekeeper”, meaning I work outside the home and am tasked with “preparing dinner without delay after (I) get home from the office at night.” I made this recipe on a weeknight and was able to have it in the oven in just 17 minutes. I imagine this recipe was popular in 1944, when women held a full third of all manufacturing jobs in the USA and the female labor force had increased by 50% over the pre-war years. If Rosie the Riveter can work in a factory all day and get a hot meal on the table at night, so can I. We can do it, ladies! Grandma didn’t have DoorDash, after all.
So, Swiss Cheese Pie. I’ve already mentioned the speed in which I prepared this dish but what are some of the other highlights? It was relatively inexpensive for one, and contained just eight ingredients, half of which were seasonings that are staples in a well-stocked store cupboard. The other four ingredients – bread, milk, cheese, and eggs – are all what I consider to be multi-purpose ingredients and will provide the basis for other meals later in the week.
Of course, a speedy and budget friendly meal is only worthwhile if it’s tasty. The verdict? The Mister gave it 4.5/5 stars. My Maman gave it 5/5. What did I think? I enjoyed it. It was a light dish with an almost custard-like or souffle-esque consistency and most definitely lighter than a standard quiche. Much to my delight the predominant flavor was, in fact, the swiss cheese. I find in many modern recipes that there are so many competing herbs, spices, and other ingredients that the dishes end up tasting like…well, not much of anything specific. But with this Swiss Cheese Pie, the cheese shone through in a perfectly balanced way. I served the pie with a simple salad of mixed greens, cucumber, and tomato tossed in French dressing and a side of applesauce. It was the perfect weeknight supper – hot, fast, and filling with one slice leftover for luncheon the next day.
I would definitely make this again and hope you give it a try yourself.
1 ½ c. bottled milk or ¾ c. evaporated milk and ¾ c. water
Directions
Place bread cubes in an ungreased 9” oven glass pie plate or shallow baking dish. Cover with the grated cheese. Combine beaten eggs, seasonings, and milk, and pour over the cheese and bread. Bake in a moderate oven of 350° F. for 30 min., or until puffed and lightly browned. Serves 4-5.
I used 6 slices of generic, store-brand white sandwich bread, standard Swiss cheese (as I don’t believe processed Swiss cheese is still manufactured – at least I could not locate it), dry mustard, and whole milk. I baked my pie for about 35 minutes.
Suggested Variations: If you have a miniscule amount of leftover ham, it would make a lovely addition to this pie if diced very small. Canned mushrooms would also work nicely – just be sure to drain them very well so as not to throw off the bread to liquid ratio.